Improving RIT in the
Uniden HR-2510 Transceiver
Tom Wheeler, NØGSG
Johnson County Radio
Amateurs Club
The Uniden HR-2510 is a mobile 10 meter transceiver that was manufactured in the late 1980s. The radio covers the entire 10 meter ham band (28.000 ~ 29.999 MHz) in CW, AM, FM, and SSB modes with 25 watts of transmitter power output. It's a compact package (about the size of a typical CB radio) and is great for operating 10 meters either as a base or mobile. This radio is a good-looking unit, as shown in Figure 1.
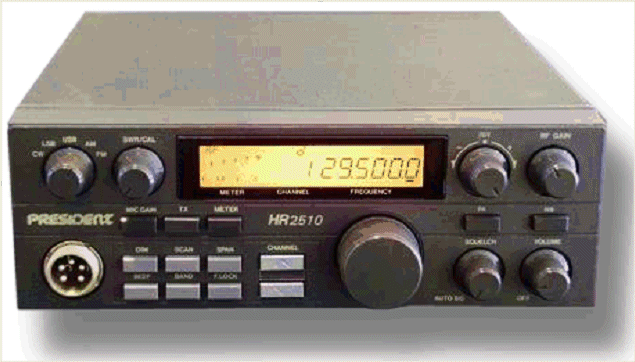
Figure 1: The Uniden HR-2510
The HR-2510 is one of several 10-meter monoband radios marketed in the 80s and 90s by Uniden, Radio Shack, Ranger Communications, and a host of others. It has a loyal following, despite having a few drawbacks. These include a primitive (and somewhat unstable!) PLL frequency synthesizer with coarse 100 Hz frequency steps (most modern radios provide 1 Hz steps with no gimmicks), lack of a standard external speaker jack (you have to wire the speaker onto an option plug), and a funky, ultra-touchy receive incremental tuning (RIT) control with a control range of ± 3 kHz nominal.
6 kHz is an immense range for RIT, especially for a radio with frequency steps of 100 Hz (0.1 kHz for comparison), and when operating mobile, that makes it very hard to drive and tune properly onto signals - - especially since there's no "zero" detent on the RIT control.
This limitation is easily corrected by adding two additional resistors to the RIT circuit, as shown in Figure 2.
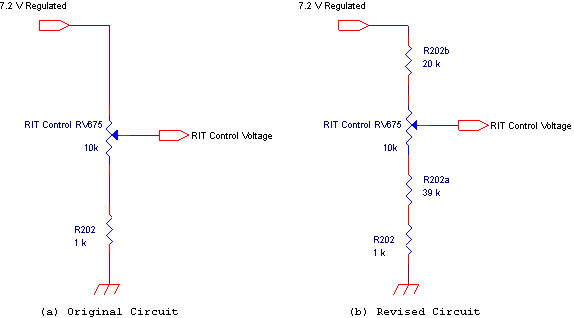
Figure 2: Electrical Changes to the HR-2510 RIT Circuit
The HR-2510 RIT circuit is pretty straightforward. Like most modern radios, the HR-2510 uses a voltage-controlled-oscillator (VCO) to provide both the receiver and transmitter frequencies. A VCO essentially converts a DC voltage to an output frequency; changing the DC input voltage to the VCO shifts its output frequency.
The RIT DC control voltage from this circuit feeds a VCO that mixes with the PLL's steady oscillator to produce the final output frequency of the radio.
The RIT circuit of Figure 2(a) is a variable voltage divider, with the RIT control RV675 providing a control voltage for the VCO in the range of about 0.65 V (wiper at the bottom - full counter-clockwise control rotation) to 7.2 V (wiper at the top - full clockwise control position).
This is a very wide voltage range - - this "delta voltage" (∆V) of 6.5 V is enough to shift the receiver a full 6 kHz (± 3 kHz). Reducing the ∆V value to say, ±1 V, is a much more reasonable approach and will reduce the RIT adjustment range to about ±250 Hz.
The new resistors, R202b and R202a in the revised circuit of Figure 2(b) do just that. They make the potentiometer RV675 a smaller fraction of the total circuit resistance, which effectively limits the voltage "swing" of the RIT control voltage, and hence, the RIT control range.
DANGER - MATH AHEAD!
We can easily verify what's going on with a little arithmetic. Remember the voltage divider rule? It can be used to check this out. The maximum output voltage is produced when the wiper of RV675 is at the top:
(1) 
(1a) ![]()
By visualizing the wiper of RV675 at the bottom, we can get the minimum output voltage as well:
(2) 
(2a) ![]()
(3) ![]()
This ∆V range value is a 1 volt control range, which is exactly what we want. Incidentally, the choice of R202a and R202b, the added resistors, must also satisfy the condition of the RIT control voltage being equal to about 4.6 volts with the RIT control at its center position. This requires a little more math to demonstrate (I can see Don is getting out of his chair to leave the room!), but essentially the resistors can be calculated by first finding the current that results in a drop of 1 volt across RV675:
(4) ![]()
This same current will flow through R202, R202a, and R202b (ignoring any loading effects). If we desire 4.6 volts at the middle of RV675, the total resistance from the center of RV675 to ground must be:
(5) ![]()
Since the lower half of RV675 is just 5k (half of the pot's value), and R202 is already known to be 1k, then R202a simply makes up the difference of resistance to account for the desired voltage drop:
(6) ![]()
The nearest standard value for R202a is 39k. The exact same reasoning can be used to calculate R202b.
END OF MATH DANGER ZONE!
How to Perform the
Modification
Performing this modification requires some disassembly of your HR-2510. If you're not comfortable doing this, seek help! There are many people in the club that can assist you.
The steps are as follows:
1. Disconnect the radio from all power and antenna connections.
2. Remove the top and bottom covers.
3. Pull off the RIT and RF Gain knobs. Using a thin-wall 3/8" socket, remove the hex nuts from both the RIT and RF Gain control shafts.
4. Remove the four screws holding the plastic front panel onto the chassis, and carefully tilt the chassis out to expose the RIT / RF Gain sub-board.
5. De-solder the shield tab from the RIT / RF Gain sub-board and remove the single screw holding it on.
6. Carefully maneuver the sub-board from the front of the radio, being careful not to break any of the attaching wires.
7. De-solder the orange wire from its two connection points.
7. Make the two trace cuts on the sub-board as shown in Figure 3. Lightly scrape off the solder resist in the two areas shown; you'll be adding two resistors.
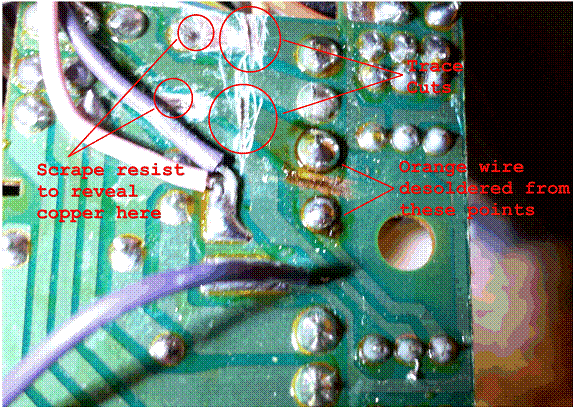
Figure 3: Cuts on the RIT / RF Gain Sub-board
8. Install R202a and R202b as shown in Figure 4.
9. Add the red jumper wire as shown, and re-solder the orange wire as shown.
10. Re-install the RIT / RF Gain sub-board into the unit being careful to not pinch any wires. Don't forget to re-solder the shield to the board!
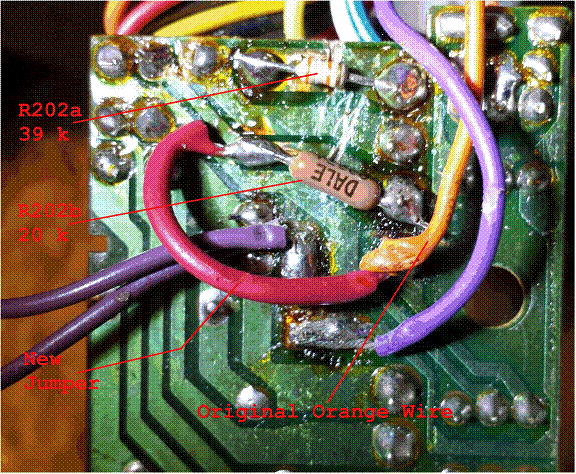
Figure 4: Final Changes to the RIT / RF Gain Sub-board
Checkout and Alignment
After you've made this modification, you'll need to check the receive and transmit frequency alignment of the radio. This is critical; you want the radio to be listening on exactly the same frequency as it's transmitting on when the RIT control is in the center position. This procedure requires a second, accurately calibrated receiver and transmitter.
Checkout Procedure
1. To check that you've made the modification successfully, connect a dummy load and power to the radio, and a DC voltmeter to the test point on the main board as shown in Figure 5.
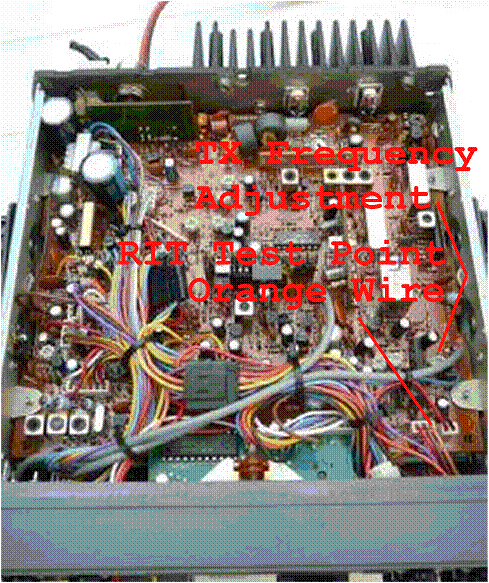
Figure 5: Main Board Test Point for RIT Voltage Check
2. With the RIT control at the mid-point (12 o'clock position), the voltage on the test point should be 3.3 V ± 0.2 V. If this is not the case, double-check your wiring.
3. The test point voltage should vary from approximately 3 V (full CCW) to 4 V (full CW).
If you get these results, congratulations - - you've successfully applied the RIT modification!
Receive and transmit
frequency alignment
1. Using a transmitter of known frequency (for example, 28.400 MHz), USB mode, OPERATING INTO A DUMMY LOAD, transmit a fixed audio tone of 1 KHz. Use the minimum power necessary. (You need to be able to monitor the audio tone as it is being sent.) You can also use a signal generator set to 28.401000 MHz for the signal source.
2. Set the HR-2510 to the same frequency (28.400.0 MHz), and USB mode. No antenna is necessary. The RIT function should be at 12 o'clock (disengaged).
3. Using a non-metallic adjustment tool, carefully adjust the core of coil L315 (near the front of the DIGITAL/PLL unit) until the received audio frequency is exactly the same pitch ("zero beat") as the transmitted tone. This calibrates the receive frequency of the radio. Be careful not to break the core of L315!
4. Turn off the transmitter, and connect the dummy load to the HR-2510. With the second transceiver in RECEIVE mode, transmit the 1 kHz audio tone from the HR-2510, again using minimum power.
5. Now adjust VR111 (near the right-front of the analog circuit board - marked as "TX Frequency Adjustment" in Figure 5) until the tones are again at zero-beat. This calibrates the transmit frequency to be exactly the same as the receive frequency.
6. Repeat Steps 1 through 5 (there is a small interaction between VR111 and L315) until everything lines up perfectly.
Note that LSB transmit/receive frequencies should "track" also; if they don't, adjustment of L9 on the analog circuit board should correct the frequency error between USB and LSB modes. If a 1 kHz signal source isn't available, the adjustments can be carefully made using speech (have a friend do the talking while you make adjustments.)
Conclusion
The HR-2510 is a great mobile radio, and it's much easier to operate when the RIT control operates properly. Not only will you find it easier to work stations (they can only hear you when you're calling on the right frequency), but your contacts will find it much more pleasant to work you as they won't have to chase your signal up or down the band. Happy operating!